For our first Costume assignment, we were asked to create a game with the Flora and conductive fabric (made of copper). My teammate, Abhishek, and I decided to make a pattycake game with gloves as controllers. (It turns out a lot of other people in the class also made glove controllers. It figures, since we are most familiar with using our hands to interact with and control our environment.)
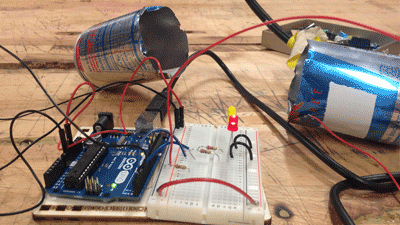
We connected each pair of hands as a switch that would produce digital inputs into the Flora, so we can differentiate between one switch on (one pair of hands in contact) or both switches are on (both pairs of hands in contact). The inputs are categorized as three states: no contact (1), one switch on (2), and both switches on (3). Then this information is fed into Processing through port communication to match with instruction patterns we created.

Sketch of different contacts. Schematic with help from Benedetta.

Gloves are switches.
For the screen interface, we designed five patterns based on the five different types of contact. They alternate between each other randomly on screen to instruct the player which hands should contact, similar to how arrows work in Dance Dance Revolution.

Five patterns for the different types of contacts.
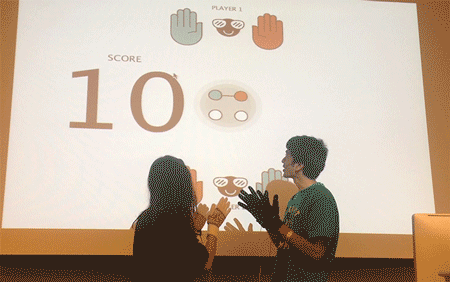
Playing pattycake (fast forwarded)
Takeaways:
- It’s really hard for more than one players to take instructions, even just a little bit complicated, on the screen and coordinate physically with each other based on those instructions. DDR works because arrows are very simple signals and the player is only interacting with another player through coordinated instructions on the screen: each player is really only focused on his/her task instead of having to physically coordinate with another player.
- It would be more appropriate for a multiplayer game, where each player need to collaborate physically, to either have the instructions embedded in the wearable controllers or provide on screen visual feedback instead of instructions that the players would have to follow.
- Audio (sound effects) and costumes can add more to the experience of a game.
Technical issues:
- We had a really hard time getting data from Flora to transfer over to Processing. We got it to work in the end by changing strings to integers and 0s to 1s in the Adafruit Arduino IDE, but the solutions still seem very arbitrary to me.
- We had originally wanted to differentiate between different types of one switch on (meaning one pair of hands in contact). For example, a player’s own hands touching would be different from the right hand of each of the players touching. This was impossible to accomplish with the two switches connection we created, because since one hand of each player is connected to the ground the signal would come from the same pin when a third hand touches either ground. We haven’t figured out an alternative circuitry.